

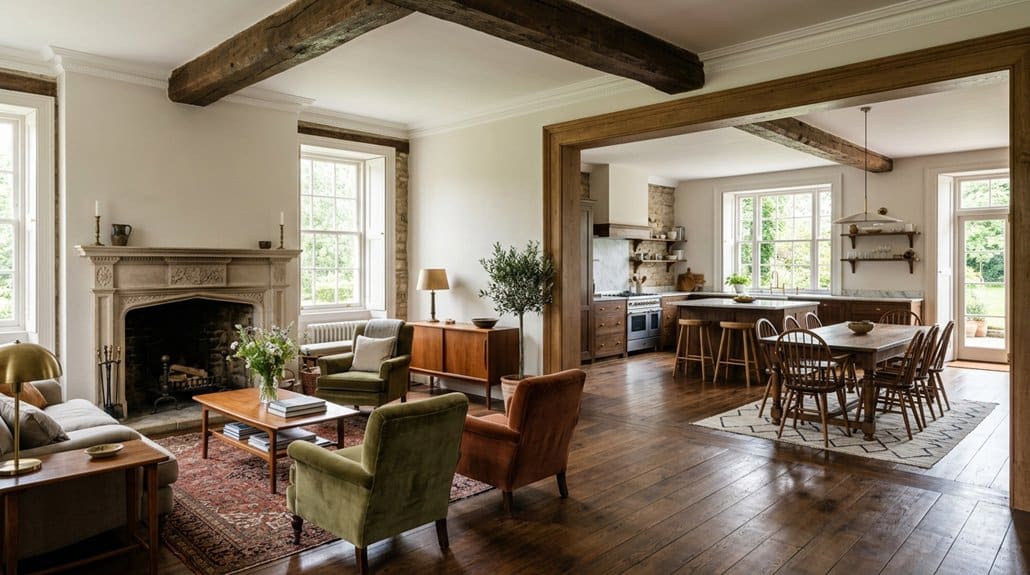
You don’t have to sacrifice a home’s character to create an open-plan layout. Start by mapping how you move through the space and which original features you want to keep, such as beams, fireplaces, or trim. Then use consistent materials, layered lighting, and carefully placed storage to define functional zones without rebuilding walls. The key is knowing where openness helps—and where a subtle boundary makes the plan work better.
Plan an Open-Plan Layout Around Daily Life
Start by mapping how you use each part of your home throughout the day. Note where you cook, eat, work, relax, and store everyday items, then trace the routes between those activities.
Measure room dimensions and mark doors, outlets, plumbing, and fixed structural elements before you move furniture or plan renovations. Check ceiling height to confirm that lighting, cabinetry, and any proposed overhead features will fit without crowding the room.
Record window placement and observe how daylight changes across the day; position seating and work surfaces to use natural light without creating glare.
Test key arrangements with scaled drawings or removable tape on the floor. Keep frequently used items near their activity areas, and preserve clear paths for carrying food, moving chairs, and reaching storage.
Reassess the plan against your actual routines before committing.
Define Zones Without Putting Walls Back
Once you’ve mapped your routines, define each zone by its function rather than by a new wall. Place seating to establish a conversation area, and orient a table toward the kitchen to mark a dining zone. Keep clear paths between entrances, work areas, and storage so furniture doesn’t obstruct circulation.
Use rugs, lighting, and changes in ceiling fixtures to signal boundaries without interrupting sightlines. A pendant over the table provides a focused cue; a floor lamp can anchor a reading corner.
For visual separation, position an open bookcase or sofa back between activities, but leave enough clearance for movement and daylight.
Manage acoustic privacy with upholstered furniture, curtains, and soft rugs that absorb sound. If you work from home, place your desk away from noisy appliances and use a screen to reduce distraction without enclosing the space.
Preserve Character With Original Features
A well-zoned open plan can still feel rooted in the home’s history. Before removing partitions, identify original features such as ceiling beams, trim, fireplaces, and door casings. Record their locations and condition, then ask a preservation specialist to assess elements that may be concealed or structurally significant.
This step supports Historical preservation and helps you avoid irreversible damage.
As you open the layout, retain features that define the building’s proportions and craftsmanship. You can expose a beam, restore a fireplace, or keep a doorway as a framed opening to mark a changeover without rebuilding a wall.
Check that any alteration complies with local heritage rules and building codes. If you must relocate or repair an original detail, document it and use methods that protect its fabric. These decisions maintain Architectural integrity while letting the plan function for your household.
Choose Materials That Tie Rooms Together
Choose a restrained palette of flooring, finishes, and hardware to connect the kitchen, dining, and living areas. Material selection works best when you repeat durable surfaces while varying texture to preserve each zone’s character. Color coordination can link existing architectural details with new cabinetry and furnishings.
| Element | Practical approach |
|---|---|
| Flooring | Continue one material across shared areas |
| Cabinetry | Match undertones, not necessarily exact colors |
| Countertops | Repeat a stone or finish selectively |
| Hardware | Use consistent metal tones |
| Trim | Retain original profiles where possible |
Check samples in your home before committing; daylight and surrounding finishes can shift how colors appear. If you keep the base palette consistent, you can introduce contrast through wood grain, tile pattern, or upholstery without making the plan feel fragmented. Choose finishes that tolerate each area’s cleaning needs and traffic, so visual continuity doesn’t come at the expense of performance.
Use Lighting to Set Each Zone Apart
Consistent materials connect an open-plan layout, while layered lighting gives each zone a distinct function. Start with ambient lighting, using dimmable ceiling fixtures or recessed lights to provide even illumination across the shared space.
Then add task lighting where you need focused visibility, such as adjustable pendants above a kitchen island or a reading lamp beside a chair. Use statement fixtures to mark key areas and reinforce your home’s character; choose scale and finish to complement the materials you’ve already selected.
Put each lighting layer on a separate switch or dimmer so you can adjust brightness for different activities and times of day. Keep color temperature consistent across connected zones, typically 2700K to 3000K for a warm residential feel.
Aim fixtures carefully to reduce glare and prevent harsh shadows on work surfaces.
Arrange Furniture for Flow and Conversation
Arrange furniture to define clear pathways between zones, keeping main routes unobstructed.
Group seating to create conversation zones, with chairs and sofas close enough for comfortable interaction.
You’ll preserve easy movement without separating the open-plan space’s functions.
Define Clear Pathways
Clear pathways make an open-plan room easier to navigate and help its distinct areas feel connected. Start by mapping your main routes between entrances, seating, dining, and kitchen areas. Keep these routes direct, with enough width for two people to pass comfortably; aim for at least 36 inches where space allows.
Place sofas, tables, and storage outside these routes, and check that doors, drawers, and appliance fronts can open without obstruction. Use rugs, lighting, or changes in flooring to signal passages without creating trip hazards. Keep furniture heights low along sightlines so you can see across the room and move confidently.
Review airflow management when positioning tall pieces, and use soft furnishings for acoustic control without narrowing walkways. Test your layout by walking each route with bags or a tray; adjust any pinch points before settling on the arrangement.
Create Conversation Zones
To create a conversation zone, place seating close enough for easy discussion while keeping the main pathways open.
Arrange sofas and chairs in a compact grouping, with seats facing one another or angled toward a shared focal point. Keep roughly 18 inches between seats and a coffee table, and leave clear routes around the grouping so movement doesn’t cut through conversations.
In an open-plan room, use a rug to define the zone without adding a wall. Position the grouping away from noisy appliances, and choose upholstered furniture to soften reflected sound.
Add acoustic treatment, such as curtains, cushions, or wall panels, to reduce reverberation.
If noise carries from adjacent areas, consider soundproofing strategies, including door seals or dense partitions.
Test sightlines and walking routes before finalizing placement.
Add Storage Without Cluttering the Space
Open-plan rooms need storage that serves daily routines without interrupting sightlines or circulation. Start by mapping what you use, where you use it, and how often you need access. Place frequently used items near their activity zones; keep seasonal or occasional items in less accessible locations.
Choose low, closed cabinets along perimeter walls to preserve visual continuity and reduce surface clutter. Hidden compartments in benches, coffee tables, or built-ins can hold everyday items without adding separate furniture.
Use vertical storage for books, equipment, and display objects, but secure tall units to the wall and keep their depth modest. Match cabinet finishes to nearby walls or millwork so storage reads as part of the architecture.
Leave clear paths and limit open shelves to items you’re prepared to maintain. Count capacity before buying.
Balance Openness With Privacy and Quiet
You can preserve quiet in an open plan by defining zones for focused work, reading, or rest. Use rugs, lighting, and furniture placement to mark these areas without closing them off.
Add screens where you need more visual privacy or sound separation.
Define Quiet Zones
While an open-plan layout connects shared spaces, it still needs places for focused work, rest, and private conversation. Define quiet zones by matching each activity to its acoustic needs. Place work areas away from kitchens and circulation paths; use soundproof partitions where speech privacy matters. Reserve silent retreat areas for reading or recovery, with comfortable seating and low noise.
| Activity | Best location | Acoustic measure |
|---|---|---|
| Focused work | Away from kitchen | Soundproof partitions |
| Reading | Low-traffic corner | Soft furnishings |
| Rest | Separated from media | Door or buffer |
| Calls | Near a wall | Acoustic panels |
Check noise levels at different times before assigning zones. You’ll protect quiet without blocking sightlines or changing the home’s character. Set clear household expectations for each zone, including when conversation or device audio is acceptable. Reassess after use; shift furniture or activities if noise still travels.
Add Privacy Screens
Quiet zones can retain sightlines while gaining privacy through well-placed screens. Choose privacy screens that filter views without blocking daylight, such as slatted timber panels, perforated metal, or reeded glass. Set them between seating areas and circulation routes to reduce visual distraction while keeping the open plan connected.
Match screen height to the task. A low divider can shield a desk or reading chair while preserving long views; a taller panel offers more concealment near a bedroom entrance. For flexibility, use ceiling-mounted curtains or freestanding screens you can reposition as needs change.
Treat screens as visual barriers, not soundproofing. If you need quieter conditions, combine them with rugs, upholstered furniture, or acoustic panels. Secure fixed screens to suitable framing, and leave clear paths for movement, light, and ventilation.
Check sightlines from seated positions before installation.
Bring Warmth Through Color, Texture, and Art
To keep an open-plan room from feeling stark, use a warm, coordinated palette and repeat it across connected areas. Vary the proportions: let one neutral dominate, then add muted accents through furnishings and art. Use Color contrast to define zones without breaking visual continuity. Textural diversity adds depth; combine matte paint, woven upholstery, natural wood, and tactile rugs.
| Element | Practical choice | Effect |
|---|---|---|
| Base color | Warm off-white | Unifies zones |
| Accent | Terracotta | Adds warmth |
| Texture | Woven linen | Softens surfaces |
| Art | Related hues | Links areas |
Hang art at seated eye level and choose pieces that share a color with nearby textiles. Repeat materials selectively, not uniformly, so each area keeps its character. Test paint and fabric samples in daylight and evening light before committing.
Avoid Common Open-Plan Design Mistakes
Common open-plan mistakes often stem from treating the entire room as one undifferentiated space. Define zones with rugs, lighting, and furniture placement, but preserve clear circulation paths between them. Don’t push every piece against the walls; float seating to create purposeful conversation areas and maintain balanced proportions.
Plan storage early to prevent clutter from spreading across shared sightlines. Use layered lighting, including task fixtures, rather than relying on a single overhead source. Check acoustics, too: hard surfaces can amplify noise, so add textiles or acoustic panels where needed.
Before choosing finishes, consider cultural influences and how you use each zone. Allow for seasonal adjustments, such as movable screens or lighter textiles, so the layout remains comfortable as daylight and household routines change.
Test furniture clearances before committing to a permanent arrangement.
Frequently Asked Questions
Do I Need Planning Permission to Create an Open-Plan Living Space?
Usually, you don’t need planning permission to create an open-plan living space inside your home. However, you may need approval if the work changes your home’s exterior, affects a listed building, or falls under local restrictions. Check with your local planning authority before starting.
Building regulations may apply, especially if you’re removing a load-bearing wall or changing fire safety, ventilation, or energy performance. Ask a structural engineer and coordinate compliant interior design.
How Much Does Removing an Interior Wall Typically Cost?
Removing an interior wall typically costs $1,000–$5,000, but you might pay $5,000–$15,000 or more if it’s load-bearing.
Your total depends on structural engineering, permits, electrical or plumbing relocation, and finish repairs.
Get a contractor to inspect the wall and provide an itemized quote before work begins.
Include interior decoration and furniture arrangement in your budget, since the altered layout may require new finishes or different furnishings.
Prices vary by location.
How Can I Tell Whether a Wall Is Load-Bearing?
You can spot clues, but only a professional can confirm whether a wall carries the home’s weight. Check whether it runs perpendicular to ceiling joists, sits near the building’s center, or aligns with supports below; these signs suggest Wall support.
Don’t rely on appearance alone: joists, beams, and past renovations can hide the load path.
Before altering the wall, arrange a Structural assessment with a qualified engineer or building professional.
Should I Hire an Architect or a Structural Engineer for Wall Removal?
For wall removal, hire a structural engineer to determine whether the wall bears loads and specify the beam, supports, and connections. You’ll also need an architect if the project changes the layout, affects windows or doors, or requires permit drawings.
Coordinate both professionals before demolition; don’t rely on visual inspection alone. Your architect can plan interior design and furniture placement, while the engineer verifies structural safety and local code requirements.
Get written approvals before work begins.
Can Underfloor Heating Be Installed After Opening up a Floor Plan?
Yes, you can install underfloor heating after opening up your floor plan, but the best method depends on floor construction and available height.
Electric systems add roughly 3–5 mm before finishes; water-based systems typically need more buildup.
Check insulation and structural capacity first.
You’ll also need to revise radiator placement, since floor heating may reduce or eliminate radiators.
A heating engineer can calculate heat loss and specify suitable insulation, controls, and floor finishes.
Leave a Reply